

Replacing Consumable Parts
The two rollers (feed roller and retard roller) installed in the scanner are consumable parts. The feed roller and retard roller wear with scanning. If the feed roller and retard roller are worn, documents may not feed correctly and paper jams and double feeds may occur.
When the total number of pages fed by the scanner exceeds the number of pages for the service life of the rollers, a message prompting you to replace the rollers is displayed when the computer is started.
Message that appears on the computer

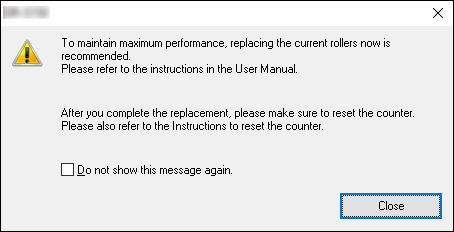

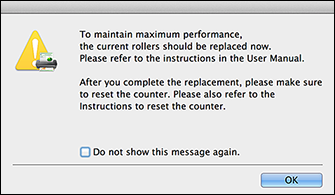
If this message begins to be displayed at startup, purchase an replacement roller kit and replace the worn parts with the consumable parts included in the kit (feed roller and retard roller). See "Replacement Parts" regarding the replacement roller kit.
Furthermore, the counter in the scanner that records the number of pages fed also needs to be reset when you replace the rollers.
-> Resetting the Counters
Even before it becomes time to replace the rollers, scanned images may become stretched in the vertical direction due to wear of the rollers. If this happens, adjust the reduction ratio.
-> About the Canon imageFORMULA Driver Setting Tool
Opening and Closing the Front Unit
-
Pull the OPEN lever and pull open the front unit toward you.
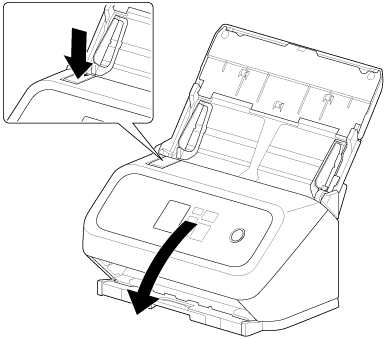
The location of each of the consumable parts is shown below.
(A) Feed Roller
(B) Retard roller (inside the front unit)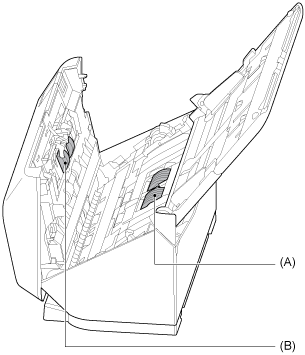
-
When closing the front unit, make sure that it is completely closed by gently pressing the left and right until you hear a click.
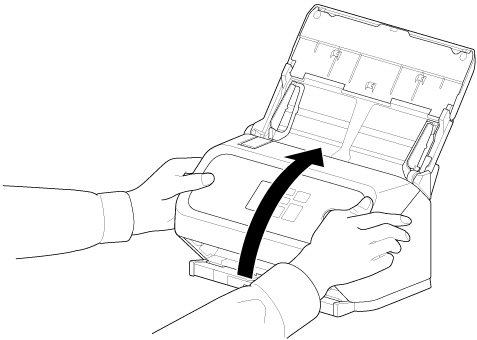
About Replacement Parts
Replacement methods vary depending on the type of replacement part you purchased.
Refill Replacement Rollers -> "Replacement Using Refill Replacement Rollers"
Replacement Roller Kit -> "Replacement Using a Replacement Roller Kit"
Replacement using refill replacement rollers
Replacing the Feed Roller
Reset the roller count after replacement of the roller.
-> Resetting the Counters
For details about the replacement procedure, see the video.

https://soft.canon-elec.co.jp/ims/r40ii/en/movie/
-
Open the roller cover.
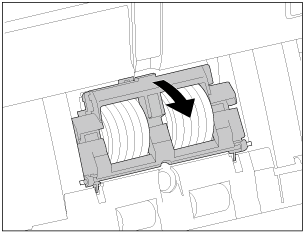
-
Remove the feed roller.
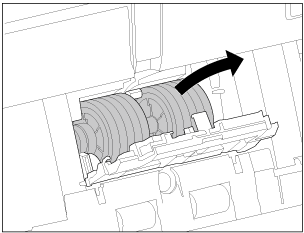
-
Remove the blue fixing component on the right side.
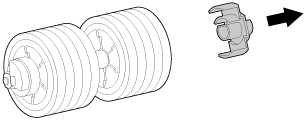
-
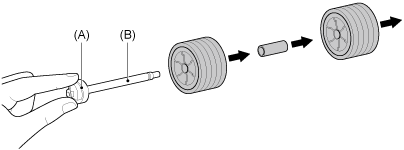
Hold the knob (A) on the left and remove the roller on the right, the blue shaft, and the roller on the left in that order.
Do not touch the metal shaft (B).
-
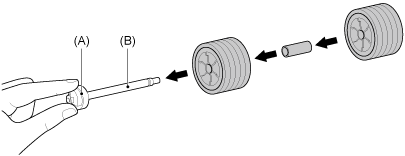
Prepare a new feed roller. Hold the knob (A) and install the roller, the blue shaft, and the roller on the left in that order.
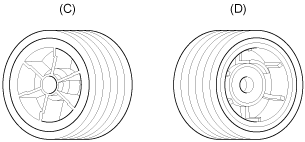
Mount the rollers so that the (C) sides face (A).
Do not touch the metal shaft (B).
The rollers are easier to mount if you rotate them toward you while inserting.
-
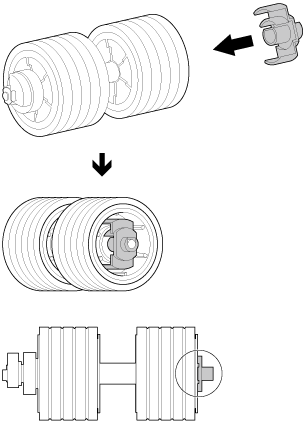
Firmly insert the blue fixing component all the way in.
Make sure that the end of the metal shaft and the fixing component are aligned.
-
Install the feed roller.
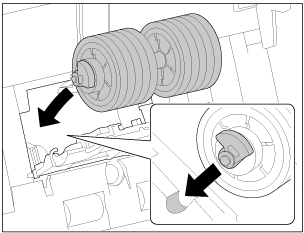
-
Close the roller cover.
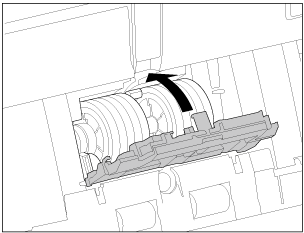
If you are unable to install it properly, please check the following.
-
Are the rollers mounted in the correct orientation?
-
Is the blue shaft installed between the rollers?
-
Is the blue fixing component firmly inserted?
Replacing the Retard Roller
Reset the roller count after replacement of the roller.
-> Resetting the Counters
For details about the replacement procedure, see the video.
https://soft.canon-elec.co.jp/ims/r40ii/en/movie/
-
Open the roller cover.
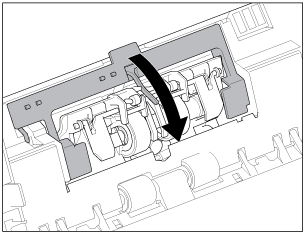
-
Remove the retard roller.
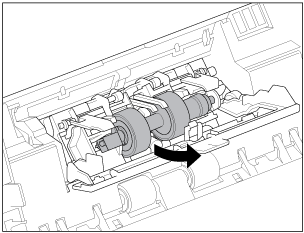
-
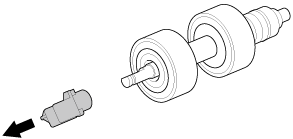
Remove the blue fixing component on the left side.
Hold the entire fixing member securely and remove it.
-
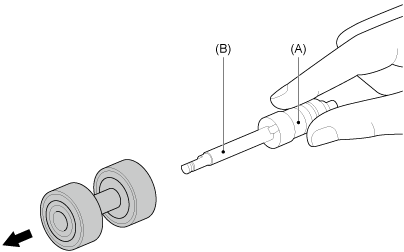
Hold the knob (A) on the right and remove the roller.
Do not touch the metal shaft (B).
-
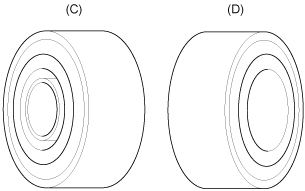
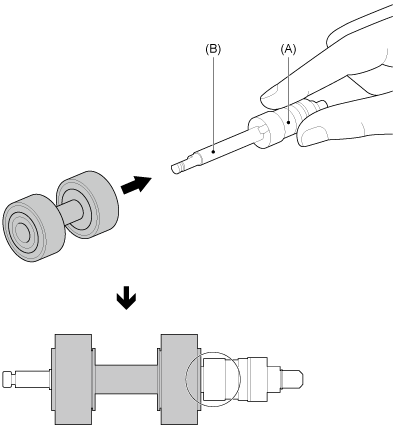
Hold the knob (A) on the right side as you insert the shaft into the new roller firmly all the way in with the side (D) facing (A).
Make sure that the end of the black shaft and the roller are aligned.
Do not touch the metal shaft (B).
The rollers are easier to mount if you rotate them while inserting.
-
Align the orientation of the hole in the blue fixing component with the metal shaft and firmly insert it all the way into the blue fixing component.
Make sure that the end of the metal shaft and the fixing component are aligned.
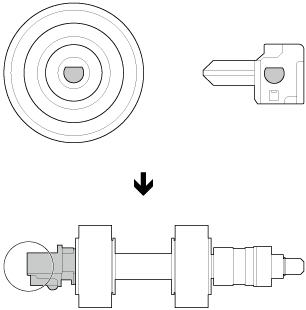
-
Starting from the bottom of part (E), mount the right side of the new retard roller to the scanner first.
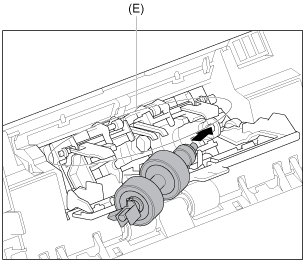
-
Push the left side of the retard roller to secure it to the scanner.
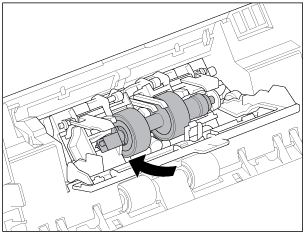
-
Close the roller cover.
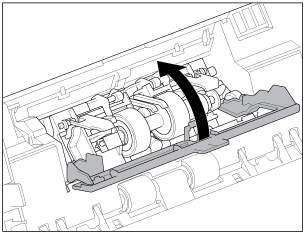
If you are unable to install it properly, please check the following.
-
Are the rollers mounted in the correct orientation?
-
Are the blue fixing components mounted in the correct orientation?
-
Are the roller and the blue fixing components firmly inserted?

Replacement using a replacement roller kit
Replacing the Feed Roller
Reset the roller count after replacement of the roller.
-> Resetting the Counters
-
Open the roller cover.
-
Remove the feed roller.
-
Install the feed roller.
-
Close the roller cover.
Replacing the Retard Roller
Reset the roller count after replacement of the roller.
-> Resetting the Counters
-
Open the roller cover.
-
Remove the retard roller.
-
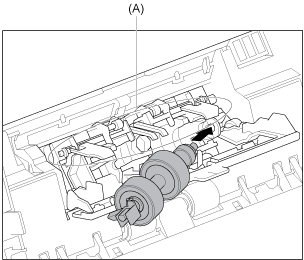
Starting from the bottom of part (A), mount the right side of the new retard roller to the scanner first.
-
Push the left side of the retard roller to secure it to the scanner.
-
Close the roller cover.
Resetting the Counters
Log on using an account with Administrator privileges.
-
Click the [Start] button, then click [All apps] – [Canon R40II] – [Canon imageFORMULA Driver Setting Tool] in that order.
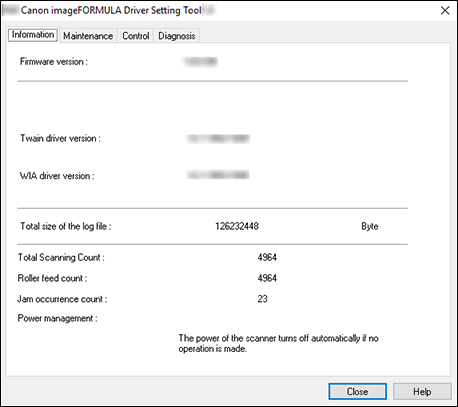
Canon imageFORMULA Driver Setting Tool will start.
-
Click the [Maintenance] tab, and then click [Reset].
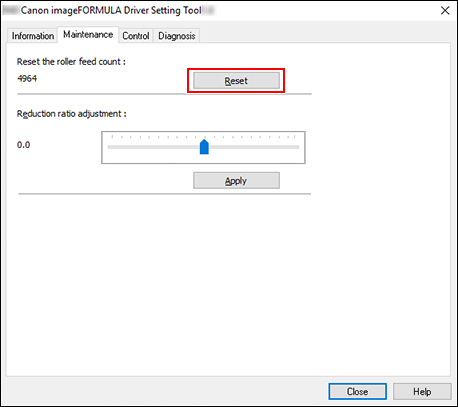
The counter resets.
-
Click [Close] to close Canon imageFORMULA Driver Setting Tool.
-
Open the scanner driver setting screen.
-
Click
 (Information button). The [Scanner Information] dialog box opens.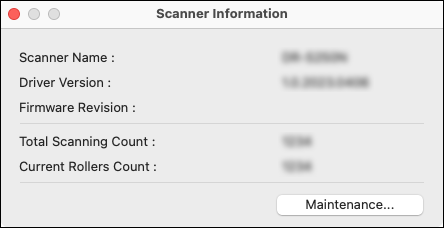
-
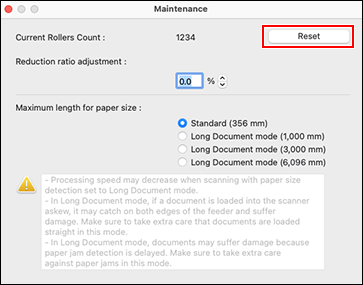
Click [Maintenance]. The [Maintenance] dialog box opens.
-
Click [Reset].
-
Click
 to close the dialog box.